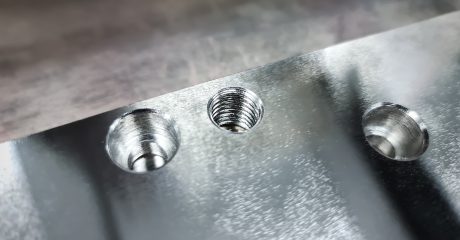
Threading is a part modification process that involves using a die tool or other appropriate tools to create a threaded hole on a part. These holes function in connecting two parts. Hence, threaded components and parts are important in industries such as the automotive and medical part manufacturing industry.
Threading a hole requires understanding the process, its requirements, machines, etc. As a result, the process can be challenging. Therefore, this article will extensively discuss what hole threading is, how to thread a hole, and what the different types are.
What Are Threaded Holes?
A threaded hole is a circular hole with an internal thread obtained by drilling the part using a die tool. Creating the internal threading is achievable using tapping, which is important when you cannot use bolts and nuts. Threaded holes are also referred to as tapped holes, i.e., holes suitable for connecting two parts using fasteners.
Threaded holes are used for the following functions:
- Connecting Mechanism – They serve as a connecting mechanism for parts using bolts or nuts. Threading prevents the fastener from losing during use and they allow the removal of the fastener when necessary.
- Easy for Shipping – Threading a hole in a part can aid in faster packaging and a more compact package. As a result, this reduces the problems with shipping, such as dimension considerations.
Types of Threaded Holes
Based on the hole depth and opening, there are two major types of hole threading. Here are their characteristics:
- Blind Holes – Blind holes do not extend through the part you are drilling. They can either have a flat bottom with the use of an end mill or a cone-shaped bottom with the use of a conventional drill.
- Through Holes – Through holes penetrate the workpiece completely. As a result, these holes have two openings on the opposite sides of a workpiece.
How To Create Threaded Holes
With the right tools and knowledge, threading can be a very simple process. With the steps below, you can easily cut internal threads into your parts:
Step #1: Create A Cored Hole
The first step in making a threaded hole is to cut a hole for a thread using a twist drill with eyes toward achieving the desired hole diameter. Here, you should ensure you use the right drill to achieve not only the diameter by the required depth.
Step #2: Chamfer The Hole
Chamfering is a process that involves using a drill bit that moves in the chuck slightly until it touches the edge of the hole. This process helps align the bolt and achieve a smooth threading process. As a result, chamfering can improve the tool’s lifespan and prevent the formation of raised burr.
Step #3: Straighten The Hole By Drilling
This involves using a drill and a motor to straighten the created hole. There are a few things to take note of under this step. The bolt size will determine the hole size before tapping. Typically, the bolt’s diameter is bigger than the drilled hole because tapping will increase the hole size later. Additionally, if you don’t want to create a thorough threaded hole, you must be careful of the hole depth. As a result, you should watch out for the type of tap you use as it will influence the hole depth.
Step #4: Tap The Drilled Hole
Tapping helps create internal threads in the hole so that a fastener can stay firm. It involves turning the tap bit in a clockwise direction. However, for every 360° clockwise rotation, make a 180° anticlockwise rotation to prevent the accumulation of chips and make room for cutting teeth.
Depending on the chamfer size, the three taps below are used for tapping holes in part manufacturing:
- Taper Tap – A taper tap is suitable for working with hard materials due to its strength and cutting pressure. It is the most common tapping tool characterized by six to seven cutting teeth that taper from the tip.
- Plug Tap – The plug tap is more suitable for a deep and thorough threaded hole. Its mechanism involves a progressive cutting motion that cuts the internal threads gradually.
- Bottoming Tap – Bottoming tap has one or two cutting teeth at the beginning of the tap. You use them when the hole needs to be very deep. Using the bottoming tap depends on the hole’s desired length. Machinists usually start with a taper or plug tap and end with a bottoming tap to achieve good threading.
Conclusion
Threading or tapping hole requires understanding the necessary processes and machines and cooperating with the right services. This process can be challenging. At Custom Tool & Grinding, with our state-of-the-art equipment, and expert teams, we can help you make custom parts with threaded holes. Feel free to contact us if you have further questions regarding the process of hole threading.
